Follow our guide to remove your 2019 RAM 1500 OEM bumper before you begin installation of your Stealth Fighter front bumper.
Preparation:
- Disconnect the negative battery terminal. Park the vehicle on level ground and set the emergency brake.
- We recommend reading through the installation instructions in whole before performing the work.
- Estimated Installation Time: 2 Hours
**This installation requires 2 people for best results**
You will need the following tools:
- Ratchet - 8mm Socket - 10mm Socket
- 12mm Socket - 17mm Socket - 18mm Socket
- 9/16" Socket - 3/4" Socket - 5/16" Allen Wrench/Socket
- Drill - 1/2" Drill Bit
Included in Kit:
- 4 - Hex Head Bolts (3/8"-16 x 1")
- 4 - Fender Washers (3/8")
- 4 - U-Nuts (3/8"-16)
- 2 - Button Head Bolts (1/2"-13 x 1 1/2")
- 8 - Black Washers (1/2")
- 4 - Nylon Lock Nuts (1/2"-13)
- 2 - Hex Head Bolts (M10-1.5 x 30mm)
- 2 - Flat Washers (M10)
RAM 1500 Stealth Fighter Front Bumper Installation
1. Install the parking sensors into your new bumper by first pressing the mounting rings into their precut holes from the front side until it clicks into place. Then, push the sensor into the mounting ring from the back side until it clicks into place. Make sure the install the sensors in the same position/orientation as they came off the OEM bumper. (Fig M)

2. Install the wire harness onto the bumper as shown in (Fig N).

3. If you have a light or winch to install in your bumper, now is a good time to do so. To install the light, follow our Universal Light Mount Kit installation guide for mounting information, but follow the light manufacturer's guide for wiring information. For winch installation, follow the manufacturer's guide for mounting and wiring information.
4. Install the supplied U-Nuts (x4) onto the bumper as shown in (Fig O).

5. Set the bumper in place on the vehicle. Loosely secure it to the vehicle using the supplied 3/8" Bolts (x4) and 3/8" Fender Washers (x4). Leave these bolts loose for now. (Fig P)

6. Use the supplied 1/2" Black Bolts (x2), 1/2" Washers (x4), and 1/2" Nuts (x2) in the lower/outer mounting hole on the truck's frame horns. When installing this bolt, use 2 additional washers (per side) between the bumper and frame horn. (Fig Q)

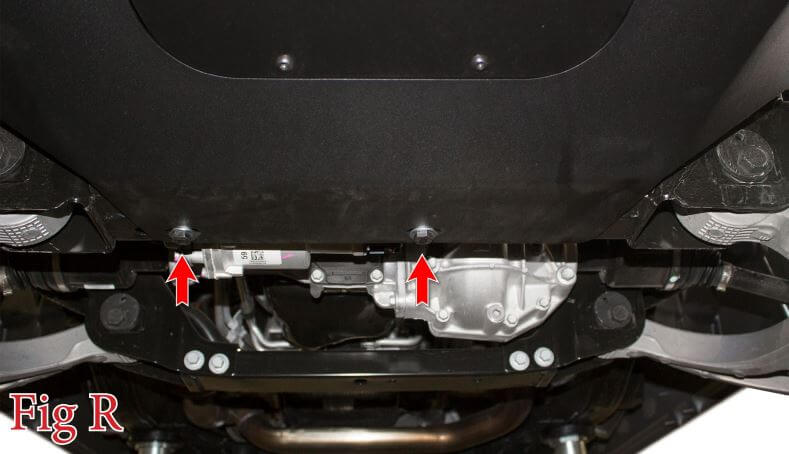
7. Install the supplied M10 Bolts (x2) and M10 Washers (x2) into the skid plate mounting holes. Leave these bolts loose for now. (Fig R)

8. Align the bumper so that it sits straight in relation to the grille/valance and is centered left to right. Then, torque the 3/8" Mounting Bolts to 25 foot pounds. Torque the 1/2" Mounting Bolts to 70 foot pounds. Torque the M10 Mounting Bolts to 30 foot pounds.
9. Reconnect the main bumper harness connector that was behind the inner fender liner piece during the OEM bumper removal.
10. Stand back and enjoy your new ADD Stealth Fighter Front Bumper.
11. Check and re-tighten, if needed, all mounting bolts after 100 miles and periodically thereafter.
Installation Video
Be sure to check out the matching Stealth Fighter rear bumper for the 2019 RAM 1500. And stay tuned for new products for the RAM 1500.
Have questions about the installation or any of our products? Give us a call at (480) 671-0820 and our product specialists can answer any questions you have.


Leave a comment