"Anyone pull the rear bumper on the JL yet? I have a new aftermarket bumper coming and I don't want to pull anything off that isn't supposed to come off"
You asked, we listened. Below is a simple step-by-step guide on safely removing your stock 2018 Jeep JL Rear Bumper. Complete every step listed below and you should have it off in less than an hour. Questions on a particular step? Call us!
Preparation:
- Disconnect the negative battery terminal. Park the vehicle on level ground and set the emergency brake.
- We recommend reading through the installation instructions in whole before performing the work.
You will need the following tools:
- Ratchet
- 8mm Socket
- 16mm Socket
- 17mm Socket
- 18mm Socket
- 21mm Socket
2018 Jeep JL Rear Bumper Removal:
1. Unplug the rear bumper harness connector, then release the two plastic clips holding the bumper end of the harness to the vehicle. This connector is located under the vehicle on the driver side. Refer to (Fig A).

2. Remove your OEM spare tire.
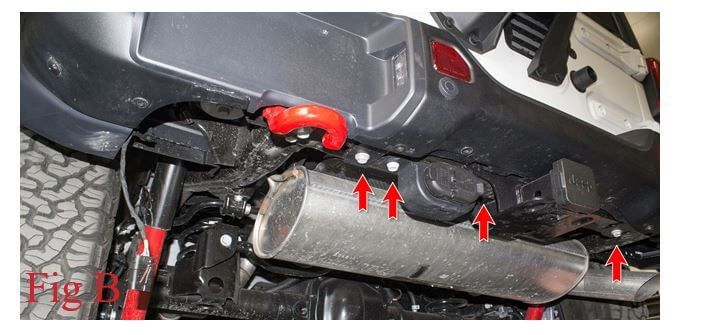
3. Using a 16mm Socket, remove the bottom two bumper bolts and the two trailer plug bracket bolts. Save these bolts for reuse. (Fig B)

4. Using a 16mm Socket, remove the bumper side support bolts (2 per side) that are accessible from underneath the truck on the outer section of the bumper. (Fig C)

5. Using a 17mm Socket, remove the bumper mounting nuts (2 per side) which are accessible from underneath the vehicle. Then, remove the OEM bumper. (Fig D)

6. Using an 8mm Socket, remove the three (per side) inner fender liner bolts referenced in (Fig E). Then, re- move the lower inner fender liner pieces from the vehicle.

7. Remove the two bolts that hold on each bumper side support bracket. Then, remove both brackets from the vehicle. (Fig F)

8. Use an 18mm Socket to remove the driver side tow hook bolts (x4). Then, use a 21mm Socket to remove the passenger side bumper mounting bracket bolts (x2). Remove the tow hook and both bumper mounting brackets from the vehicle. (Fig G)

9. Remove the parking sensors from the OEM rear bumper. Do this by first spreading the tabs on the inner mounting ring and releasing the sensor out the back side of the bumper. Then, spread the tabs on the outer mounting ring to release it from the inner mounting ring. Finally, press the tabs in on the inner mounting ring to push it out the front side of the bumper. (Fig H)

10. Release the series of plastic clips holding the OEM Bumper Harness in the OEM Bumper. Then, remove the harness from the OEM Bumper. (Fig I)

Questions, comments or concerns? Feel free to give us a call to talk to our Jeep product experts at (480) 671-0820. Now that the stock front bumper has been removed, click to follow our Jeep JL rear bumper installation for your ADD bumper.
Also, browse our brand new 2018 Jeep JL Bumpers! We now offer a front bumper that comes in three different configurations based on style, use & budget, one new rear bumper & our new tire carrier that can hold up a 40" tire and is made from 1/8" and 3/16" steel.


Leave a comment